Tuesday, June 28, 2016
Wednesday, June 22, 2016
DIY - Wire Rack / Shelf
DIY - Closet Wire Rack / Shelf
--------------------------------------------
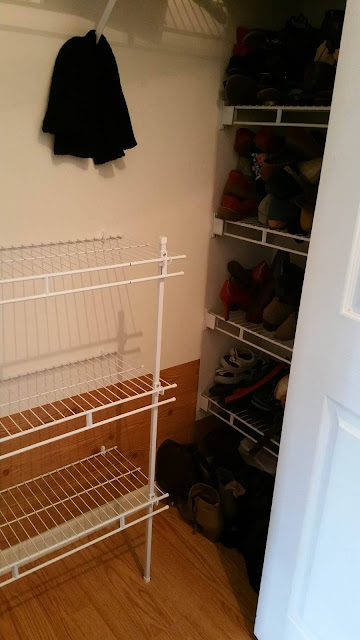
1st picture below is the New Wire Rack I built/put together.
2nd picture is the wire racks/shelves that I had before with the height just below the new one.
Both old and new were on the right side of my walk-in closet, I didn't like the shelved rack and wanted more space for hanging my dresses, so build the single wire rack to serve the purpose.
3rd and the 4th pic are the pics of the finished wire rack with clothes/dresses hanging. :)
Materials Needed to Build this kind of Wire Rack
-------------------------------------------------------------------
* Wire Shelfing - 16" Rubbermaid Wire Shelf from Lowe's I got it cut to the size I needed.
Note: If you are getting it cut to a smaller size, make sure you take all the pieces, else it will go for waste, as thye don't use the unwanted piece, but you have to pay for the whole piece.
They have different standard lengths, so choose what you want first.
(similar product: http://www.lowes.com/pd/Rubbermaid-FreeSlide-12-ft-L-x-12-in-D-White-Wire-Shelf/3055511)
* End Brackets - This is used if you want the rack to be attached to the wall ( I used 1 of these to attach it to the wall at the left end and to the front part of the rack, as in above picture, but didn't use it on the other end as the rack, as it was not near to wall. (below is the sample pic of the end bracket)
* Back Wall Clips: These are the clips that needs to be put on the wall to hold the rack in place. You can also put them where the studs are so that the rack gets more good support and sturdy. The below pic is not so clear, but you can even notice it in the above pic right behind the end bracket.
Below is the picture of the back wall clip in package. You can buy how many ever u want according to your rack length and how many u want. I would prefer one at least few inches apart to get better support for the rack.
* End Caps: These would be needed to cover the ends of the rack to cover the sharp edges. This package has different sizes to fit different size wires in the same rack.
(below 1st pic, you can see them on the right end of the rack that white cap like things. 2 nd picture is the pic of the package. This package has all sizes needed)
* Wall Bracket for Shelf - I am not sure of the exact name, but I am trying to provide a picture and a similar item from lowe's.
http://www.lowes.com/pd/ClosetMaid-20-in-White-Straight-Shelving-Hardware/3057939
This helps to give support/hold the rack from bottom as shown in below picture. You will need atleast two of them and try to fix it where the stud is to make it more sturdier.
1st below pic has only one, but the finished rack has to as in 2 nd below picture.
Other Hardware that you need are listed below with pictures.
* This is a stud finder
* This is a drill - is wireless and after charging enough can be taken anywhere. This comes with a all the sizes drill screws, I got this from menards for i guess $30-40.
* Measuring Tape:
* You need pencil, leveler or ruler etc.,
How to Build:
* Measure the rack size you want to put in the room. Make down the length and width you want and also note whether you want to fix the ends to the wall or not and accordingly you can get the end brackets.
* Get the rack size cut to the size you need.
* Make the place you want to fix the rack. If you want to fix the ends to the wall then also mark the place where you want to put the end bracket.
* Now find the studs on the wall and mark them too.
* Now fix the end bracket first. First you need to drill holes, put the backing and then nail the end bracket in place.
* Now mark the places where you want to put your back wall clips. I would put one each at least few inches away to give more support. First dill a hole, then put backing and then nail it.
* Cover the rack ends with end caps first before you put the rack on.
* When you are done with the wall bracket and back wall clips, place the rack in place and now take the wall bracket which helps the shelf to stand up right and mark the place where it has to be nailed. Drill hole, place backing and then nail the bracket in place.
* Now you rack is all done. :)
DIY - Shoe Wire Rack / Shelf
-----------------------------------------
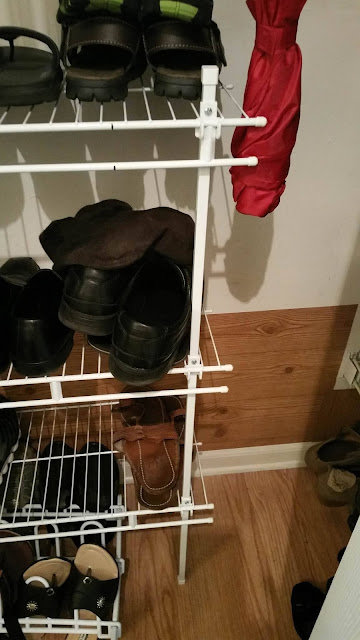
below pictures are the finished new shoe rack. you can also buil longer shelves or add more shelves with different height etc.,
Things needed to build this shelf is all same except the support pole. This has two pieces to it. You can either use both pole as one, as they have provided a small attachment pipe like thing that can be used to extend this pole to a longer one (I mean double the size than the picture), but i didn't need it more taller, so used it as 2 pole on the end as a support and to hold the shelves. It comes as a package with screws and holdings, so you don't need anything else other than the wire shelves, cut to the size you want or use standard sizes, caps and wall clips, you can also use wall end brackets if you think you need more grip or support.
I hope this tutorial is helpful. If you have any more questions, you are welcome to message here or on my fb page. :)
DIY
DIY JEWELRY BOARD

Taking orders - can be customized to different size, different material to be used for thr board, different hanging options, different colors.
Price depends on each customizion
DIY BANGLES, BRACELET AND CLIP HOLDER

Taking orders - can be customized to different size, different material to be used for thr board, different hanging options, different colors.
Price depends on each customizion
DIY BANGLES, BRACELET AND CLIP HOLDER
Monday, June 20, 2016
Earrings, Necklace and Bracelets
Peach and Silver Stoned Necklace and Earrings
Grey Blue Necklace, Earrings and Bracelet
Multi Color Pearl Necklace
(Regular Off white, Pink, Light and Dark Blue, Dark Green Pearls)
(Can be worn as 1, 2 or 3 layers)
Grey Necklace
Orange Earrings
Pearls, yellow and blue Earrings
Colorful Gem Bracelet and Earrings
Blue and Red Earrings
Baby Pink Pearl Necklace and Earrings
Red Rose Necklace and Earrings
Blue and Silver Earrings
Florascent Green, White and Silver Elegant Necklace and Earrings
Rustic Shell Bead Necklaces and Earrings
Red Cute Earring
Yellow and Grey Glass Bead Earring
Pink Sawroski Crystal Elements and Pearl Necklace and Earrings
Elegant Red and Grey Earrirngs
Pink Earirings
White and Pink Earrirngs
Blue and Black Galss Bead Earrirngs
Black and Metallic Cute Earrings
Bright Blue Glass Bead and Brass Metal Earrings
Shell with Silver Necklace
Tricolor Peal Elegant Necklace with Earirings
Rustic Blue and Yellow Necklace and Earrings
Grey Shell Beads Necklace and Earrings
Green and Black Dotted Glass Bead Earrings
Blue Glass Bead Earrings
Red Glass Bead Earrings
Sand Stone Dangling Earrings
Antique Beaded Earring
Wood Bead Earrings
Black Earrings and Necklace
Glass Bead Earrings and Bracelet
Colored Pearl Earrings
Cute Earrings
Glass Bead Earrings
Floral Finish Earrings
Sky Blue Swarovski elements in Silver Chain with Earring sand Necklace
Cute Peal Antique Metal Earrings
Glass Bean Earrings and Bracelet
Subscribe to:
Posts (Atom)


